martes, julio 24, 2012

VMWorkstation 8 Repair "The MSI" Installation Error

 Source: http://www.sysprobs.com/fixed-the-msi-failed-vmware-workstation-uninstall-repair-and-update-in-windows-7

Today I faced a strange problem on updating VMware workstation to latest 8.0.1, “The MSI failed” error in my Windows 7 host. Later, I fixed the issue and updated successfully, it was due to small Windows OS problem, but took some time to figure it out. So, I decided to share in this small guide how to fix The MSI failed in VMware workstation uninstall, repair and update in Windows 7.
Normally while updating VMware product to latest version, it uninstalls the existing product and starts the upgrade. Therefore, the uninstallation process should go smoothly to start the update.
When I tried to install VMware workstation 8.0.1 top of 8.0.0 in Windows 7 host, while uninstallation process is running I get “The MSI failed” error and installation quit immediately.
The msi failed error

The below Steps did not help me,

1) I thought it could be a problem with installation exe file, so downloaded  and tried again.
2) Uninstalling the existing version from control panel in Windows 7, it returned the same error.
3)  Repairing the existing version from control panel.
4) Repairing the existing version by running the 8.0.0 installation exe file ( which will bring the same options (Repair, Modify and uninstall) as from control panel)
5) Restarting several times between each above steps.

So, What is next?

We have Google!.
I found a useful article in VMware official site regarding this issue and it made me to think that I’m not alone with this problem.  The MSI failed problem while installing, updating or uninstalling is there for long time with VMware’s earlier products too.
Windows OS temporary files in your local user profile is the reason for this.  Normally, any installations in Windows OS extract its files to temporary location and then run the installation from there. Some programs leave these temp files and folders after the installation to use in future.
VMware say, “This is not a VMware issue”

The resolution is simple in Windows 7,

1) Go to ‘Temp’ directory which will be located under user (profile folder) who does the installation/uninstallation in your computer.
Type %TEMP% in Run or search field in Windows 7.
2) Make sure none of the VMware installation or uninstallation process is running. Select and Delete all files and folders in this location.
delete temp files
3) Restart the computer and try now. It should work and you should be able to upgrade VMware workstation now.
The original VMware KB article on The MSI failed issue is available here.
You can follow other mentioned steps in above article if only deleting Temp folder contents did not help.
Remember, it is just a Windows OS problem, so do not try anything else in with VMware. Even you can run a full disk cleanup and checkdisk in Windows 7 to fix this issue.

Back up and restore information in Firefox profiles

 Source: http://support.mozilla.org/en-US/kb/back-and-restore-information-firefox-profiles

Mozilla Firefox stores all your personal settings, such as bookmarks, passwords and extensions, in a profile folder on your computer, in a location separate from the Firefox program. This article explains how to back up your profile, restore it, or move your profile to a new location or computer. 

Locate your profile folder

The default location of the Firefox profile folder is %APPDATA%\Mozilla\Firefox\Profiles\xxxxxxxx.default\.
  • %APPDATA% is shorthand for the C:\Users\\AppData\Roaming\ folder (Windows 7/Vista) or the C:\Documents and Settings\\Application Data\ folder (Windows XP/2000), which depends on your Windows user account name.
  • xxxxxxxx represents a random string of 8 characters.
You can locate your profile folder using these instructions:

Windows 7 and Vista

  1. Click the Windows Start button, and type %APPDATA%\Mozilla\Firefox\Profiles\ in the search box at bottom of the Start menu, without pressing Enter.
  2. A list of profiles will appear at the top of the Start menu. You can click on any of the profiles (e.g. xxxxxxxx.default) to open it with Windows Explorer.


98ed7b83d09ef2c94285fcf99165ff31-1258904886-852-1.png


Windows 2000 and XP

  1. Click the Windows Start button, and select Run....

    win-run.png
  2. Type in %APPDATA%\Mozilla\Firefox\Profiles\ then click OK.

    win-rundialog.png
Windows Explorer will open the Profiles folder, which contains a folder for each profile.

Backing up your profile

To back up your profile, first close Firefox if it is open and then copy the profile folder to another location.
  1. At the top of the Firefox window, click on the Firefox button (File menu in Windows XP) and then click Exit.
  2. Locate your profile folder, as explained above.
  3. Go to one level above your profile's folder, i.e. to %APPDATA%\Mozilla\Firefox\Profiles\
  4. Right-click on your profile folder (e.g. xxxxxxxx.default), and select Copy.
  5. Right-click the backup location (e.g. a USB-stick or a blank CD-RW disc), and select Paste.

Restoring a profile backup

  1. At the top of the Firefox window, click on the Firefox button (File menu in Windows XP) and then click Exit.
  2. If your existing profile folder and profile backup folder have the same name, simply replace the existing profile folder with the profile backup, then start Firefox.
    Important: The profile folder names must match exactly for this to work, including the random string of 8 characters. If the names do not match or if you are restoring a backup to a different location, follow the steps below.

Restoring to a different location

If the profile folder names do not match or if you want to move or restore a profile to a different location, do the following:
  1. Completely close Firefox, as explained above.
  2. Use the Firefox Profile Manager to create a new profile in your desired location, then exit the Profile Manager.
    Note: If you just installed Firefox on a new computer, you can use the default profile that is automatically created when you first run Firefox, instead of creating a new profile.
  3. Locate the backed up profile folder on your hard drive or backup medium (e.g., your USB-stick).
  4. Open the profile folder backup (e.g., the xxxxxxxx.default backup).
  5. Copy the entire contents of the profile folder backup, such as the mimeTypes.rdf file, prefs.js file, bookmarkbackups folder, etc.
  6. Locate and open the new profile folder as explained above and then close Firefox (if open).
  7. Paste the contents of the backed up profile folder into the new profile folder, overwriting existing files of the same name.
  8. Start Firefox.


lunes, julio 23, 2012

How to Reinstall Windows Without Having to Reactivate

Source: http://www.howtogeek.com/75496/how-to-reinstall-windows-without-having-to-reactivate/


Every time you format and reinstall your PC, you have to activate Windows again, which can sometimes be a pain once you’ve done it too many times. Here’s how to backup and then restore the activation status.
Note: we aren’t going to cover how to reinstall Windows, since you should know how to do that already. This article just covers backing up and restoring your activation.

Introduction

Advanced Token Manager easily allows you to back up all the information that Windows uses to check the validity of you copy of Windows. Collectively called a Token, this information can be backed up to an external storage medium. Once you have formatted you can import the Token and your Windows will be genuine again.

Backing Up

Once you have grabbed your copy of Advanced Token Manager from here, you can extract the zip file and then run the executable file.

When the advanced token manager launches, you will see the BIG Backup Activation button. Click it to begin backing up your token. All the “BBB” characters are just masking the real product key, don’t worry that is not your real product key.

Once you click the Backup Activation button, we expect that 99% of you will be prompted with this message. Unless some of you are ultra geeky and using KMS at home, you will get this message. You can just click yes to continue.

Once activation is finished being backed up, you will see a folder called “Windows Activation Backup” in the same folder that you launched the token manager from, this contains the backup.

Now we have reloaded Windows on the same PC, as you can see it is not activated.

Now I can run the advanced token manager, this time it will say Restore instead of Backup.

Once you click Restore you will be prompted to make sure you want to do this, click the next button to start the restoration.

Once it has completed a success message will appear.

If you go check your validity in the System Settings, you should have the genuine badge back.

The advanced token manager can also support Office Activation and works on all versions of Windows 7.

Get Installation Date of your Windows OS

Script to determine the Operating System installation date

To run the script, copy the following lines to a Notepad document, and save as a file with .VBS extension (use double-quotes) and double-click the file. The installation date and time would be displayed.

' © 2006 Ramesh Srinivasan.
'Returns the Operating System installation date.
strComputer = "."
Set dtmInstallDate = CreateObject( _
  "WbemScripting.SWbemDateTime")
Set objWMIService = GetObject("winmgmts:" _
  & "{impersonationLevel=impersonate}!\\" _
  & strComputer & "\root\cimv2")
Set colOperatingSystems = objWMIService.ExecQuery _
  ("Select * from Win32_OperatingSystem")
For Each objOperatingSystem in colOperatingSystems
  MsgBox "Install Date: " & getmydat (objOperatingSystem.InstallDate)
Next
Function getmydat(wmitime)
  dtmInstallDate.Value = wmitime
  getmydat = dtmInstallDate.GetVarDate
End function

Two more methods - For Windows XP Professional systems

Systeminfo.exe console-utility

Systeminfo command-line tool displays detailed configuration information about a computer and its operating system, including operating system configuration, security information, product ID, and hardware properties, such as RAM, disk space, and network cards. More information available at Microsoft Windows XP - Systeminfo

WMIC - command-line tool

Click Start, Run and type:
CMD /K WMIC OS GET InstallDate
You'll see the Operating System installation date (in WMI format). The first eight characters in that output gives you the installation date.

domingo, julio 22, 2012

VMware: Add second disk to a Windows virtual machine

Fuente: http://linhost.info/2009/08/vmware-add-second-disk-to-a-windows-virtual-machine/

If make use of virtual machines as much as I do, then you will be in need of more storage space and at the same time running out of space. One way to expand the storage capacity of a virtual machine is to add a second virtual disk.
For this tutorial I will be adding a 50GB virtual hard disk to a Windows Server 2003 virtual machine. The instructions should apply to all versions of VMware Workstations and VMware Player, the instructions will also work with all versions of Windows.

ADD THE SECOND disk

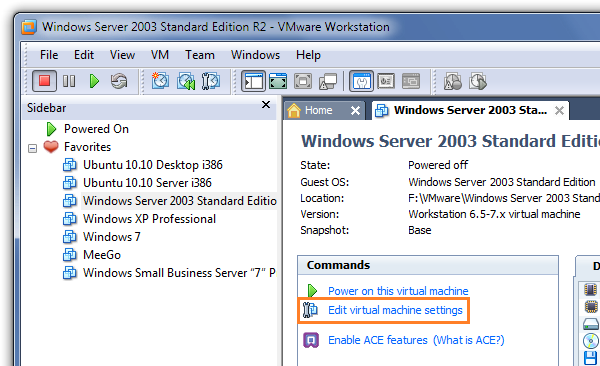
Start VMware Workstation and select the virtual machine you wish to add the second disk. Click on Edit virtual machine settings.

Click on image to enlarge
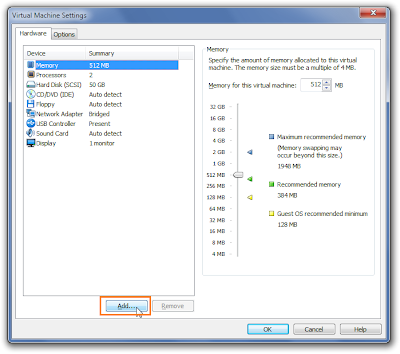
A new window will open. Click on Add button at the bottom.

Click on image to enlarge
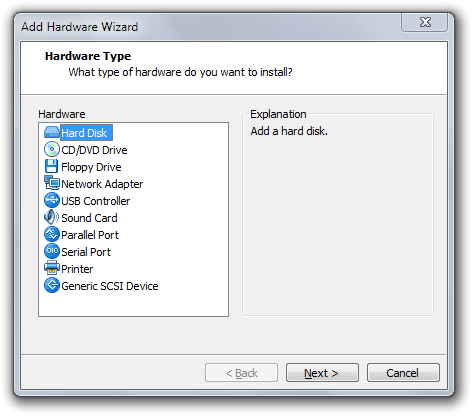
Now the Add Hardware Wizard window will present you with several options. Click on Hard Disk and then click on Next.
vmware_3
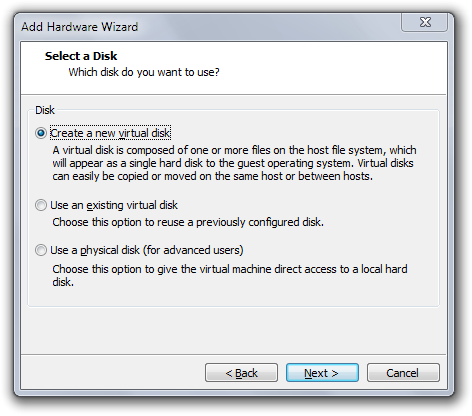
Select Create a new virtual disk and then on Next.
vmware_4
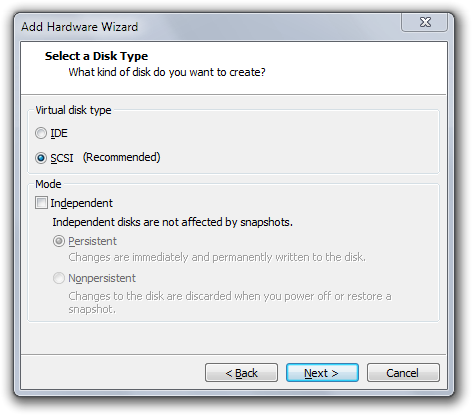
Usually, VMware Workstation will suggest a type of virtual disk. In this case the suggested type is SCSI (Recommended) and click on Next.
vmware_5
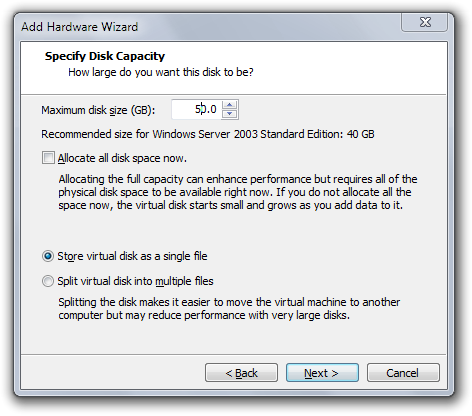
Choose the size of the virtual disk you wish to create in GB. My preference is to choose to Store virtual disk as a single file and click on Next.
vmware_6
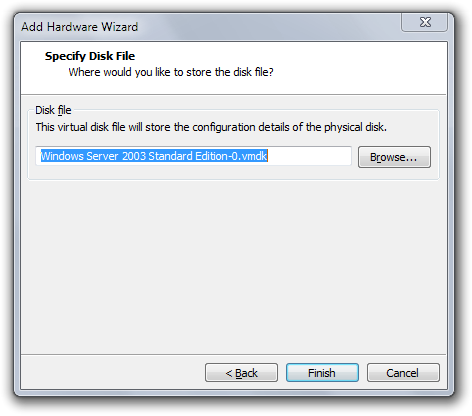
Now just tell it where to store the new disk file and click on Finish. I would recommend going with the default, keep all files in the same place.
vmware_7
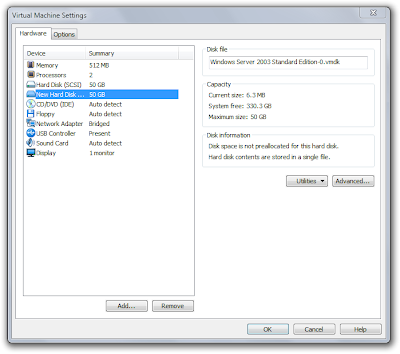
Again you are presented with an overview of the system configuration. Notice how the new second disk, click on Save to preserve the changes.

Click on image to enlarge

INITIALIZE THE NEW DISK

If you boot the virtual machine the new virtual disk will not appear under windows. You have to make use of a Windows utility called compmgmt.msc which will allow us to manage(initialize, format) the new disk.
You will need administrative privileges
Click on Start > Run and type compmgmt.msc and then hit OK.
This will bring a new window, click on Next to continue.
win
Here you are being asked which disk you want to initialize. The C disk is know as disk 0, using logic we know that our new disk will be known as disk 1. Check Disk 1 and click on Next
win_2
Select the disk you want to convert. Of course, we want to convert Disk 1. Check on Disk 1 and click on Next.
win_3
Now the wizard is giving you an overview of whats about to be done to the disk. If you are OK with the changes click Finish.
win_4
We still have some work to do before we can use that new disk. Now right click on the unallocated volume(Disk 1) and select New volume….
win_5
Click Next on the New Volume Wizard.
win_6
Select the volume type. In this case Simple and click on Next.
win_7
In this screen you are being asked to select the disk and disk size. I want to use all of the available space, just click on Next to continue.
win_8
Just accept the default disk letter and click on Next.
win_10
Now this is important. You are being asked whether you want to format the disk with NTFS and the volume label. Don’t be lazy like me, give the Volume Label a proper name. Then just hit Next.
win_9
Again you are being presented with an overview of whats about to be done with the disk. If you agree, click on Finish.
win_11
The new disk will now be formatted, allow for some time.
win_12
After the formatting is done you can close the window and go to Start > My Computer and you should be able to see the new disk with the assigned letter E.

win_13